
Fast, Affordable Laser Cutting for Students & Designers
Laser Cutting Services in Sydney
At Aussie Magic Studio, we provide fast, precise, and affordable laser cutting services in Sydney with a focus on non-metal materials such as wood, acrylic, and cardboard. Whether you are a student rushing to finish a final model, a small creative studio prototyping new ideas, or an architecture firm preparing presentation boards, our team delivers clean, professional-grade results you can rely on. With transparent pricing, quick turnaround times — often within 1- 2 business days — and express options available, we make it simple to bring your ideas to life across Sydney and Australia-wide.
How we laser cut

Step 1 Choose your Material
At Aussie Magic Studio, we stock a wide selection of carefully tested materials, all verified for compatibility with our laser cutting machines. You can explore more details in our Material Shop or download our Quick Material List (CSV) for fast reference.
-
We offer a wide range of in-stock, laser-ready materials, pre-tested for clean and safe cutting. For the best results, we recommend using these.
You are also welcome to bring your own sheets, as long as they meet our machine requirements:
Maximum sheet size: 1200 × 900 mm
Sheets must be flat — bent or warped materials cannot be processed
Please prepare extra material for test cuts or in case of errors
-
For safety and quality reasons, we cannot process:
PVC and vinyl – release toxic fumes
Polycarbonate and ABS – burn and discolor easily
Metals – not supported by CO₂ lasers
Glass and stone – cutting not possible (limited etching only)
Fiberglass and carbon fiber – dangerous fumes, fire risk
Foam (e.g., polystyrene) – high fire hazard
For guidance on choosing the right material, see our blog post: Best Materials for Laser Cutting Projects, or contact our team for tailored advice.
Step 2 SETUP YOUR FILE
Next, import your design files into the file setup template provided below and carefully follow the included instructions to ensure your files are laser-ready.
We support industry-standard design software — Rhino, Illustrator, and AutoCAD. Please download and use the template that matches your software to streamline the setup process and avoid delays.
Illustrator Template_Laser Cut
For more information about how to setup your file, please read How to prepare files for laser cutting
Step3 UPLOAD YOUR FILE TO CUT/GETTING A QUOTE
Once your artwork file is prepared and you’ve selected a material from our range — or supplied your own to our Sydney studio — we’ll be happy to provide you with a free laser cutting quote.
Our pricing is structured into several clear parts — lower than industry peers and fully transparent.
-
Our setup fee covers the time required to download and import your file, check for errors, review instructions and materials, format the job for cutting, and prepare it for production.
Standard Setup Fee: $10 for jobs of up to 5 sheets using our templates and laser-ready files.
Additional Sheets: For jobs with more than 5 sheets, the setup fee increases by $5 for every additional 3 sheets (or part thereof), to cover the extra preparation and layout work required.
File Conversion: If files come from other company templates or are not laser-ready and require conversion, a setup fee will also apply.
Additional labour may apply if files require significant fixing or editing. Our rate is $50/hour (pro-rata). We really do not wish to charge this fee. So please make sure that your file is laser ready.
Most student projects fall into the $10–20 range, while larger or more complex jobs may require a higher setup fee.
-
We keep a variety of laser-ready materials in stock — plywood, acrylic, and card — all pre-tested for clean, safe cutting.
Huge savings: By ordering materials in bulk, we can pass the savings directly on to you, ensuring some of the lowest possible material costs so you can maximise your laser cutting budget.
Fair calculation: Material costs in your quote are based on how many of our sheets are required for your job. We will try our best to optimise layouts to minimise waste and reduce cost.
Bring your own: You’re welcome to supply your own materials — there’s no extra charge.
You can always nest your parts efficiently on the template to save material and further cut costs.
-
Laser cutting is charged at $24 per half hour, based on the actual cutting time your file requires.
Cutting & Scoring: The laser traces every line in your drawing. Straight lines cut faster and cost less, while curves, dense shapes, and thick materials take longer and cost more. Duplicate lines will be cut twice, so always check your files carefully.
Raster Engraving: Works like traditional printing, with the laser scanning in fine lines. Costs are proportional to the engraved surface area, so large filled areas can take significantly longer — and cost more — than simple cuts or scoring. It is best used for detailed logos, images, and patterns. Grouping objects closely together helps reduce time and cost.
-
At Aussie Magic Studio, we believe in fair and transparent pricing. To support our community, we offer discounts on laser cutting services:
Students – Enjoy 10% off with a valid student ID. Perfect for cutting portfolios, presentation models, or end-of-semester projects.
Small Creative Studios & DIY Makers – Get 5% off all jobs, helping independent designers create prototypes and custom pieces affordably.
Architecture & Design Firms – We offer custom partnership rates and bulk order discounts for offices handling frequent or large-scale cutting projects.
Example: A USYD student laser cutting five sheets of plywood for a 1:200 site model saves 10%, while a small studio prototyping a furniture design enjoys 5% off. Larger firms working on repeated model production benefit from tailored partnership rates.
Check out our in-depth article if you want to understand key factor that affects laser cutting cost: How Much Does Laser Cutting Cost in Sydney?
Step 4 RECEIVE YOUR WORK
Once you’ve uploaded your laser cutting files, our team will review them and provide you with a clear quote along with an estimated turnaround time via email. We aim to make the process as smooth and transparent as possible — from file submission to delivery of your finished work.
-
Most standard laser cutting jobs are completed within 1–2 business days, depending on file complexity and material availability.
For simple student projects, we can often complete jobs even faster — sometimes within the same day if files are ready to cut.
During busy seasons (such as university submission deadlines), we also provide an Express Service for urgent projects. Files submitted before 2:30 pm may be eligible for same-day completion.
You’ll always receive a clear estimated completion time when we send your quote, so you’ll know exactly when your work will be ready.
-
Whether you’re coming by public transport or driving, getting to our Petersham studio is simple and convenient.
By Public Transport
Our studio is easily accessible via Sydney public transit. The closest train station is Petersham, just a short walk or bus ride away. Several bus routes — including 428 and 445 — also stop along New Canterbury Road at West Street, right near our location. Use the Transport NSW Trip Planner or Moovit to map your trip in real time.By Car: Enter via a small driveway on Wardell Road to access our back yard loading zone and on-site parking. Street parking is available on Wardell Road, or you can use the Officeworks car park just across the road.
Opening Hours: We’re open Monday to Sunday, 9:30 am – 6:00 pm. You’re welcome to pick up your work during these hours. On especially busy days, we may work later, and we’re happy to arrange an appointment-based pickup time if needed.
-
We make delivery simple and transparent, whether you’re a student, a local business, or ordering from outside Sydney.
Flat Rate for Universities: $12 flat rate for jobs delivered to USYD, UTS, and UNSW. Perfect for student projects and portfolio deadlines.
Distance-Based Delivery (from our Petersham studio, 196 New Canterbury Road):
Within 6 km → $15
6–10 km → $20
Over 10 km (within Sydney Metro) → Quoted individually, or fulfilled through Uber Direct or similar couriers (charged at cost).
Beyond Sydney Metro / Interstate: We work with a range of third party courier partners, quoted by weight and destination, with optional insurance for added peace of mind.
💡 Example: A USYD student needing same-day delivery to campus pays just $12 flat rate, while a small studio 8 km away from Petersham pays $20. For clients in Melbourne or Brisbane, delivery is handled by Australia Post with tracking and insurance available.
For deliveries within 10 km of our shop, we usually start delivering after business hours in the evening.
-
Payment can be made in advance by phone or online, or upon collection at our store by card, cash, or online transfer. For deliveries, please note that only cash is accepted on site. If paying online, a copy of the bank transfer receipt is required as confirmation. A 1.5% surcharge applies to all card payments to cover processing costs.
Add-on Services
At Aussie Magic Studio, we know every project is unique. That’s why we provide optional add-on services to help you achieve the best results possible. From protecting surfaces to keeping small parts in place, or even speeding up your turnaround, these extras give you more control over the final outcome.
Bridging Point Service (Optional Add-on)
Overview
When cutting small or delicate pieces, especially from plywood or screenboard, parts can scatter or drop into the machine bed once fully cut. Our bridging point service solves this by adding tiny gaps (tabs) of around 0.4 mm along the cut lines.
Benefits
Keeps small parts securely attached to the sheet, preventing loss.
Especially useful for cardboard, where masking tape cannot be used.
Maintains layout integrity — all parts stay in place after cutting.
Easy to remove afterwards with a craft knife or by snapping apart.
Important Notes
Not suitable for acrylic: Acrylic is brittle, and breaking parts from the sheet can easily cause cracks or breakage.
Not recommended for sheets thicker than 3 mm: The force required to separate parts becomes too high, increasing the risk of damage.
Works best with thin materials (≤3 mm) such as cardboard, screenboard, or thin plywood.
Cost
Free of charge — you decide whether to enable this option.
How it works
To make your job easier, we automatically add bridge points to all cardboard cutting jobs, unless otherwise specified. This prevents small pieces from scattering and ensures your layout stays intact.
When you submit your file, our form will include options to:
Enable bridge points for screenboard or plywood (if needed).
Opt-out of bridge points for cardboard if you prefer not to use them.
*If you decide not to use bridge points, we’ll instead secure your cut pieces with masking tape, so everything stays neatly in place until you’re ready to use them.
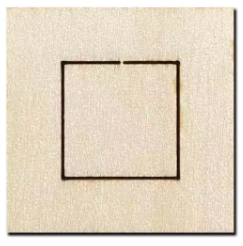
Image below indicates how bridging point in laser cutting works — small connecting tabs that hold parts in place and prevent them from falling during cutting:
Masking Tape / Protective Paper
Overview
Laser cutting can leave burn or smoke marks on surfaces. With masking tape (protective paper), you can reduce these marks and achieve a cleaner finish.
Details
Apply to one side ($5) or both sides ($10).
Works best on plywood, acrylic, leather, fabric, and screenboard.
Peel off after cutting; useful for spray painting as well.
Not suitable for cardboard, as peeling may damage the surface.
How it works
In our template, please fill in “Front”, “Back”, “Double-sided”, or “None” in the Masking Option field. If you leave this field blank, we will treat it as None by default.
When filling out the upload form, please also indicate whether you would like masking applied. Make sure to specify the corresponding sheet numbers from your uploaded template:
which sheets require masking on the front,
which require masking on the back,
and which require double-sided masking.
* Important note on orientation
The “front” refers to the side directly facing the laser during cutting (i.e., the projection of your uploaded file).
The “back” is the underside of the material.
In most cases, the back side is more prone to burn marks than the front. However, it’s up to you to decide which faces of your material will be visible in your design and which will remain hidden.
Please refer to the below image for side-by-side comparison of laser-cut surfaces with and without protective paper.

Express Service
When deadlines are tight, our express service ensures your job is prioritised.
Standard turnaround: Most jobs are completed within 1–2 business days.
Express option: Same-day turnaround available if files are received before 2:30 PM cutoff time.
Express Fee
A flat $25 express fee applies.
For larger jobs, the fee is 25% of the cutting cost (whichever is greater).
Material costs are not included in the express surcharge.
Student and small creative studio discounts also apply to express fees, so you’ll still enjoy reduced pricing while getting your job faster.
FAQ
-
We strongly recommend vector formats such as 3DM, DXF, AI (saved from Rhino, AutoCAD, or Illustrator).
We can also accept PDF,SVG and CDR, but they may require conversion and could incur extra setup fee.
Raster images (JPEG, PNG) can only be used for engraving, not cutting. -
We do not provide full design or drafting services.
However, we are happy to answer questions and guide you on how to correctly prepare your files.
For detailed steps, please check our article: [How to Prepare Files for Laser Cutting]. -
We supply and stock a wide range of pre-tested materials such as plywood, acrylic, cardboard, and specialty papers.
You may also bring your own material, but please provide extra for test cuts and potential adjustments.
❌ We cannot cut the following: PVC, vinyl, polycarbonate, ABS, metals, glass, stone, fiberglass, carbon fiber, or foam (fire hazard). -
Our cutting bed is 1200 × 900 mm.
Please make sure your sheets fit within this size, and that materials are flat (not bent or warped). -
Most standard jobs are completed within 1- 2 business days.
We also offer an Express Service for urgent deadlines:
Files submitted before 2:30 pm can often be completed the same day.
Files received after 2:30 pm will be processed the following business day.
During peak times (e.g., end-of-semester), express slots may fill quickly — please confirm availability with us in advance.
-
Pricing is based on cutting time ($24 per 30 min), plus setup fee, materials, and delivery if required.
Engraving (raster) may cost more than scoring or cutting, as it depends on the surface area engraved.
See our guide: [How Much Does Laser Cutting Cost in Sydney?] -
Pickup: From our Petersham studio (easy access via public transport or car).
Flat rate $12 delivery to USYD, UTS, and UNSW.
Distance-based delivery: $15 within 6 km, $20 within 6–10 km, quoted beyond.
Interstate / beyond Sydney Metro: Australia Post, quoted by weight and location.
-
Yes, we support our community with:
10% off for students (with valid student ID).
5% off for small creative studios and DIY makers.
Partnership rates for architecture and design firms.
See more: [Discounts & Special Offers].
-
We can cut acrylic, MDF, and plywood up to 12 mm thick, depending on material density.
For screenboard and boxboard, the maximum thickness is 5 mm.For other materials, the maximum cutting thickness may vary. In these cases, we usually perform a test cut to determine the correct settings and confirm whether full cutting is possible.